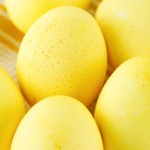
Air Fryer Dyed Easter Eggs
Make gorgeous, vibrant yellow Easter eggs with natural dye.
Servings 6
Calories 84kcal
Ingredients
To Make Eggs in Air Fryer:
- 6-12 Eggs
To Dye The Eggs:
- 1 Quart (946ml) Water
- 5 Tablespoons Turmeric
- 1 Tablespoon Vinegar
Instructions
- Preheat your air fryer to 250 degrees F / 120 degrees C.
- Set a wire rack into the air fryer basket and place the eggs in a single layer on top.
- Cook for 16 minutes.
- Remove the eggs from the air fryer and plunge them into an ice water bath to halt the cooking process.
- Cool the eggs completely before dyeing.
- Bring water to boil in a pot large enough to hold all of your eggs.
- Stir the turmeric into the boiling water.
- Once the turmeric has fully dissolved (about ten minutes), remove it from the heat.
- Add the vinegar and stir to mix well.
- Allow the water to cool, then add the cooked eggs, ensuring they’re completely covered by the turmeric liquid.
- Soak the eggs in the dye until the desired color is reached. We colored 12 eggs at one time and left them in the dye for 8 hours.
- Lightly swish the eggs in the liquid as you bring them out of the dye. This will prevent foam or bubbles from sticking to the eggs. Dry the eggs on paper towels.
- Store the unpeeled eggs in the fridge up to one week.
- Important: If you display your dyed eggs at room temperature for more than 2 hours, they will not be safe to eat and should be discarded.
Notes
- Hard boil the eggs before dying. Raw eggs may break in the dye bath.
- For more hard boiled eggs, you may need to cook the eggs in batches.
- No air fryer? No problem. We love how easy it is to make air fryer hard boiled eggs but you can cook the raw eggs using your favorite method.
- Turmeric eggs will dye pretty evenly but you can expect some speckles from the turmeric. It’s very pretty.
- Dye eggs so they are completely submerged in dye.
- It’s important you use the right amount of white vinegar. Too little vinegar and the Easter eggs won’t hold the dye well. Too much, and the vinegar will start eating the shell of the egg.
- You can dye your eggs for varying times from as little as 30 minutes to several hours or even overnight to reach the desired shade. Different dying times will create varying shades of yellow for pale to a deep gold. It’s fun to play with!
- Make Easter egg designs on your eggs with a white or clear wax crayon before dying them in order to make shapes and pictures!
- Gently wrap rubber bands around the eggs before adding to the dye to make line patterns.
- Use a slotted spoon to lift the Easter egg out of the turmeric dye and dry them on a paper towel.
- You will need one quart of water for every dozen eggs.
- After your eggs have dried, gently rub the surface with a bit of vegetable oil to really make them shine.
- Storage - keep dyed eggs in the fridge for up to a week.
- There are 0 WW Blue Plan SmartPoints in one serving.
Nutrition
Calories: 84kcal | Carbohydrates: 4g | Protein: 6g | Fat: 5g | Saturated Fat: 2g | Polyunsaturated Fat: 1g | Monounsaturated Fat: 2g | Trans Fat: 1g | Cholesterol: 164mg | Sodium: 73mg | Potassium: 208mg | Fiber: 1g | Sugar: 1g | Vitamin A: 238IU | Vitamin C: 2mg | Calcium: 40mg | Iron: 3mg